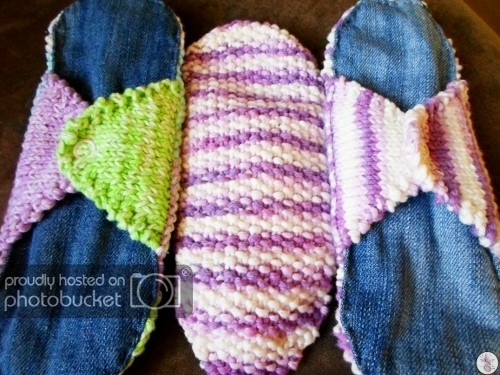
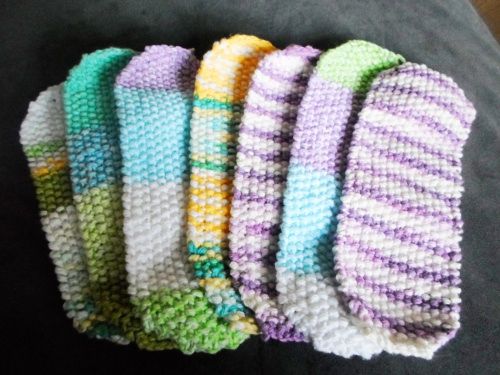
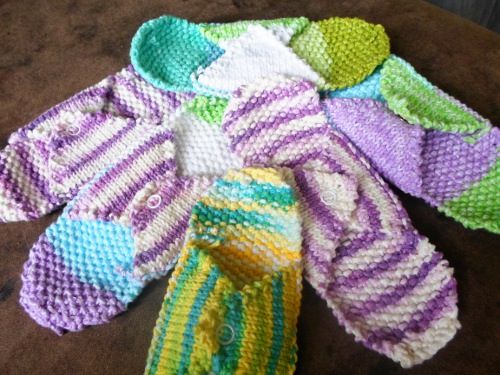
It’s been many years since I last picked up knitting needles, but after Aviya’s birth I used reusable pads for the first time ever, and I am sold on them. I’m in no hurry for that part of my life to return, but when the day does come, I will be a full on reusable pad girl. It’s so much nicer than disposables!
My fellow NPN volunteer Destany, who blogs at They Are All Of Me recently offered to share her instructions for DIY knitted pads, and I jumped at the opportunity. Maybe someone will enjoy making them so much, they’ll gift me a few. A girl can dream, right?
I once asked my mother growing up, “What did women use for their periods before we had disposable pads and tampons?” She said that they used old rags or anything they could find around the house that could be thrown away. I immediately looked at the dirty grey dust cloth I had just used and held it up to ask her if that’s what she meant.

She nodded. “Yup!”
Compared to the starkly white bleached cotton pads sitting upstairs behind the toilet, the idea of using old rags seemed a horror – poor Grandma!
Oh mother… If only we’d had internet! I always found her answer woefully inadequate. However, it wasn’t her fault. Women of the pre-Kotex era simply did not speak of menstruation or share their habits.
Fortunately these days we have the Museum of Menstruation to gain a little insight. Information is still sketchy, but it would appear that some women indeed used cloth “rags” and I can see that they may have used old fabric for this, but it wouldn’t have been a dirty dust rag. It would have been clean, you know. And there’s no telling what women of upper class may have used, but I can imagine it would have been better than what the lower class had to get by with.
The reason I asked my mother, apart from curiosity, is that there simply had to be a better way. Those disposable pads were (and still are) very uncomfortable to me. They give me rashes, dry me out, they bulk up in places, and when you have one flip over while pulling up your breeches and the sticky side gets stuck to you instead of your panties? Nightmare. Total nightmare!
And then there’s the disposal. Wadded up period packages filling up the wastebasket, the time spent on carefully unwrapping, changing, rolling up the old pad and winding the wax paper strip around the outside of it so that it could be put inside the plastic wrapper without sticking to the sides of it. It’s a huge hassle.
Fortunately, women these days have many options. I don’t have to choose between a wad of chemical laced paper or a dingy old rag!1 Many companies make reusable cloth pads and menstrual cups are becoming increasingly popular. As a seamstress, I have been making my own cloth pads. However, one day when I was knitting up a new kitchen towel that felt super soft and thick, I was struck with inspiration to knit some new cloth pads!
Before you get wigged out at how complicated or off putting it would be to reuse cloth sanitary napkins, let me break this down for you.
This is me on disposable pads:
Get my period. Look in the cupboard. Count how many pads I have before I need to hightail it to the store to buy more (or argue with the husband about going up and getting me some if I’m laid up with cramps). Spend the week changing out pad after pad, leaving the used ones in the can beside the toilet.2 Run out and buy more pads when I’m wearing my last one. At the end of the week, take out the bathroom trash. *When using disposable pads, my periods lasted anywhere from 4 to 6 days.
This is me on reusable pads and a menstrual cup:
Get my period. Insert my cup and grab a clean cloth pad from my dresser drawer. Count the pads. I have six, just like always. Twice a day I change the pad and put the old one in a ceramic lidded pot that I keep beneath the bathroom sink. At the end of my period, dump the ceramic pot into the washing machine with a load of towels. Launder. Place fresh clean pads back into my dresser drawer for next month and clean/sanitize the cup. *Using a menstrual cup and reusable pads, my period lasts 2 to 3 days.3
I find reusable products are much easier, more convenient, and frankly, a lot more sanitary not having a pile of gross pads filling up the trash. Mold on unused tampons is far more common than you’d guess. And you won’t know if the tampon you’re using has any mold on it because you’re not allowed to see it before inserting it.
 Now onto the pattern!
This pattern is highly versatile. Use it to make plain panty liners for very light days or back up to a cup; use it to make slightly more absorbent pads with wings; add a sturdy backing to it to handle your heavy days. You can also use your preferred materials like a soft chenille yarn.
If you have very heavy periods, you can even knit an extra top piece to place on top of your finished pad, for extra absorbency.
Knitted Basic Panty Liner:
Use WW cotton yarn, size 2 needles.
CO 8 stitches
k, p, k, p, k, p, k, p
p, m1, k, p, k, p, k, p, m1, k
k, k, p, k, p, k, p, k, p, p
p, m1, p, k, p, k, p, k, p, k, m1, k
k, p, k, p, k, p, k, p, k, p, k, p
p, m1, k, p, k, p, k, p, k, p, k, p, m1, k
k, k, p, k, p, k, p, k, p, k, p, k, p, p
p, m1, p, k, p, k, p, k, p, k, p, k, p, k, m1, k
*k, p, *all the way across
*p, k, *all the way across
Repeat the last two rows until you have the length of liner you wish. 60 rows or six inches for medium, 80 rows or eight inches for large.
**Your last row before beginning to decrease should end with a knit stitch.
K2tog, p, k, p, k, p, k, p, k, p, k, p, k, p2tog
*p, k, *all the way across
p2tog, k, p, k, p, k, p, k, p, k, p, k2tog
*k, p, *all the way across
k2tog, p, k, p, k, p, k, p, k, p2tog
*p, k, *all the way across
p2tog, k, p, k, p, k, p, k2tog
*k, p, *all the way across
Bind off and weave in ends.
You can use the basic liners for light spotting, or as a double up for heavy days.
I decided to give them wings and it was really easy.

Find the horizontal stitches on the very edge of the liner. These are the purls. Noting the center, slide your needle beneath ten of these stitches on either side of the center, so that you have 20 stitches on your needle. Beginning from the right side, knit across to form a base of your wing. Knit as follows:
*k, *all the way across
k, k, p16, k, k
k2tog, k16, k2tog
k, k, p14, k, k,
k2tog, k14, k2tog
k, k, p12, k, k
k2tog, k12, k2tog
k, k, p10, k, k
k2tog, k10, k2tog
k, k, p8, k, k
k2tog, k8, k2tog
k, k, p6, k, k
k2tog, k6, k2tog
k, k, p4, k, k
k2tog, k4, k2tog
k, k, p2, k, k
k2tog, k2, k2tog
k, k, k, k
k2tog, k2tog
p2tog
bind off
Do this on the other side as well. Weave in all of your ends, and apply the snaps according to the package directions. 
I know many women prefer a more protective backing on their liners, and that is easy enough to add to these. I chose denim, but other sturdy fabrics such as corduroy will also work. You may choose to use PUL, or polyurethane lined (waterproof) fabric.
Place your liner facing down onto a piece of paper and trace around it. Use this template as guide, and cut your backing fabric about a quarter of an inch larger all the way around. Snip the rounded edges of your backing fabric to minimize puckering or bunching.
Line up your backing and your top pieces, and place a strip of terrycloth between the two layers.

Pin it and stitch it down, an eighth of an inch from the edge.

Use a nice thickly woven terrycloth for your liners.

When pinning, try to eliminate any bulky areas.

I handstitched my backing on, if you machine stitch, you a long stitch setting.
That is it, your liners are complete! Here are some links that explain proper care of cloth menstrual products:
Menstruation Dot Com, Luna Pads, Mama Cloth Green Feminine Care
1. Despite the fact that women are known to absorb chemicals into their bodies by means of vaginal exposure (through tampons and even sanitary napkins), menstrual product companies are not expected to disclose the ingredients they use on their packaging. Tampons and napkins are known to contain many harmful substances including dioxins (according to the FDA).
Exposure to dioxins, which are highly-toxic chemicals, can lead to skin problems, liver dysfunction, immune system issues, endocrine system problems, and issues with reproduction and fertility.http://teenhealth.about.com/od/physicalhealth/a/toxictampons.htm
2. Personally, I find the use of over the counter sanitary pads incredibly messy I require a bit of extra upkeep throughout my menstrual week, including diligent cleaning. This is not true with a menstrual cup. The menses is contained within the vagina until I choose to conveniently dispose of it and normal bathing is more than sufficient. I get to feel clean and fresh as always, and have numerous times even forgotten that I’m having a period.
Becoming Cruncy
3. No one knows for certain why foregoing disposable mass produced period protection leads to shorter, lighter periods but the stories are far too common to dismiss. Personally, I didn’t believe it and was completely shocked when my periods began lasting only half as long as they did before within only 3 months. This phenomenon has led some to conclude that the chemicals in these products are causing the prolonged/heavier bleeding and some have even accused the companies of adding asbestos to them in order to prompt the excess bleeding. Whatever the reason, I’m pretty amazed and grateful!
Natural Parents Network – Reusasable Menstural Products
The pictures don’t show! 8′-(
Is there any other place where I can see the pictures?
they should be visible for you now. Sorry about that!
I can’t read this article on my iPad as you social media icons are i the way. Such a shame.
thanks for letting me know. I’ll see what I can do about that!
Whats the stitch called where you add the wings. I cant get it. I need to look at a utube. But dont know what to search for. The fist bit were you put through 10 to get 20? Im lost.
I am going to make these. Do they stay put down there really good if you don’t put a snap on it? If I did want to put a snap on it where did you find the snaps you used and how exactly did you install them?
Isn’t that a lot of work?! Why not just use a menstrual cup like the Diva. Same environmental benefits, minus all the laundry.
No more work than making anything else. Some people don’t like menstrual cups. Different strokes for different folks and all.
Dana, it’s called a seed stitch. 🙂
Hi. This looks really cool. The variegated colours are so cheerful too.
I already use cloth, but I like this idea especially as a liner. Tell me something though: since I may need to change up number of stitches and length, is there a special name for the stitch pattern you used?
Hello, Dana!
Looks like she used a Seed Stitch pattern, but don’t quote me on that. 😉
Would love to make these soon! Hopefully I can shorten the length of my period by stopping using manufactured menstrual products.