Is it just me or does the universe just give us a reason to eat chocolate pretty much every month for at least half of the year? Right now we’re getting ready for Easter and when our #BostikBlogger box arrived full of little eggs, ‘nesting’ paper and a handful of bunnies, it was pretty clear I was going to have to head out and buy some chocolate eggs (because I really needed the excuse!). While the eggs themselves need no ceremony to be eaten, we thought some Easter Egg Baskets that gave a little nod to spring would be ideal.
I started making these Easter egg baskets with plain yellow paper that came in our box – I thought we’d make daffodils, at first – but then I remembered this gorgeous book for Spring and Easter Patterned Paper I bought a few years ago. I only had two sheets left in the book, and this seemed an ideal project to finish it up on. (This particular book called Spring & Easter Patterned Paper from Crelando doesn’t seem to be available online. I found it at Lidl some years ago. You can find other Paper Packs on Amazon though, or use plain or printed card to achieve the same effect.
Step 1: Draw a teardrop shape. For a flower Easter egg basket big enough to fit a Creme Egg or similar, make the tear drop a little less than half the width of an A4 page.
Step 2: Fold the page in half, lengthwise, so you can cut the petals two at a time. I found if the paper is thin enough I could fold it in half and cut four at a time. You need 9 petals for each flower.
Step 3: Cut a little notch into the bottom, wider edge of each flower. About a centimetre (half an inch) is sufficient. This is so that you can fold the flower in on itself and make it stand up in a 3D sort of way.
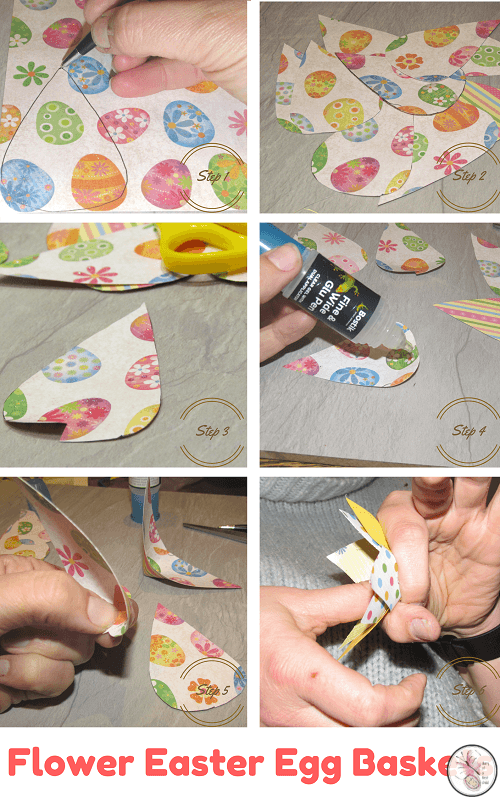
Step 4: Use a good glue and wet the area around the notch you cut in step 3. Fold the paper in over itself so that the one side of the notch rests on the other side.
Step 5: I found it helps to actually just hold the paper for a minute or so, so that the glue has time to stick properly. Follow this step with the five petals, adding a bit more glue on each layer so that the flower sticks together. You’ll see the notch-fold created a natural ‘corner’ – that’s where you glue them together. It kind of forms the receptacle part of a real flower.
Repeat step 4 with the last four petals, but pull the left side of the notch over the right side a little deeper, so that the inner layer of petals stands up a little more. Repeat step five.
Step 6: Hold the centre of the flower in one hand, then using the thumb of the other hand, press the centre inwards to help the flower stand up a little more. Add a yellow foam dot to the centre (the carpel) to finish the flower for your Easter Egg Baskets.
Finally, pop the flowers on some shredded tissue paper, and put them in a gift box, or a basket, and put a chocolate egg of your choice in the centre.
For more Easter crafts, click here.
See more Easter crafts from other Bostik Bloggers:
We were sent a box of Easter themed crafts from Craft Merrily as part of the Bostik Bloggers project

