
This month on #BostikBloggers we’re all about Christmas, like much of the rest of the world, so we have decided to host a Christmas tea party for some of our neighbours and friends. We made a set of paper snowflake fairies and decided to use them as invitations to our Christmas party. Here’s how we made the snowflake fairies. You will need:
- White paper
- Skin coloured paper
- Tissue paper or coloured paper
- Scissors
- Glitter
- Glue
- Pen
- Felt
To make your snowflake fairies:
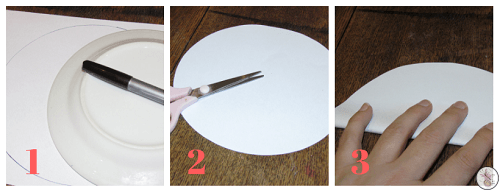
- Use a small side plate and trace a circle on white paper.
- Cut out the circle
- Fold in half.
- Fold in half again and in half again.
- Cut a half circle, triangles, slashes or a half a heart.
- Open the circle and glue the front.

- Sprinkling glitter all over.
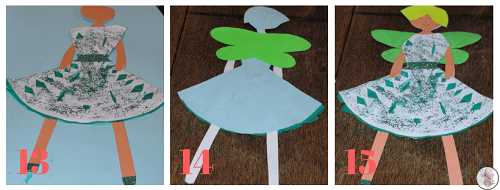
- Glue the back of the ‘snowflake’ and attach coloured paper to it. Cut it out. I left a bit of the tissue paper sticking out like the ‘puff’ under a skirt.
- Cut the circle in half, then cut a bodice off. This will be the top.

- Glue the bodice to the bottom to make a dress.
- Cut legs, a head and arms from the skin coloured paper.
- Glue the legs and body to the back of the dress.

- Stick the dress to a plain page and cut out the dress. The plain page is to cover all the ‘insides’.
- Fold a sheet of coloured paper in half then draw wings. Cut them out and open, which will give you balanced wings. We have some patterned adhesive paper, which I glued to coloured paper to make textured wings.
- Draw eyes, a nose and mouth on the face.
- Use felt or paper to make hair.
- Finish off the fairy by giving her a belt and shoes in the same colour as the belt.

Have a look at our other Christmas crafts for more festive inspirations and see the other Bostik Bloggers Christmas themed crafts below:
